

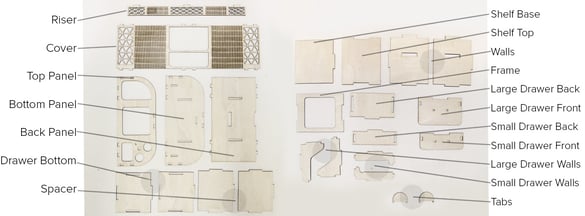

Assembly
We will begin by creating the shelf that will hold the drawers. Place the back panel on your work surface, and attach the walls to the panel.

Keep the wide notches in line with the wide notch on the back panel.

Next, glue the two spacer panels together to create a thicker piece.

Let Dry

Attach this to the assembly using the wide notches.

Attach the bottom panel to the assembly.

Slide the shelf base into the remaining tab.

Add glue to the back of the Frame panel, and adhere this to the shelf top.

Attach this panel to the top of the structure to complete the inner shelf.


Next, align the front cover over the openings of the shelf, and insert the center tabs into the bottom panel.

Bend the cover to wrap around either side, and insert the tabs into the bottom panel.

Attach the top panel to the assembly using the corresponding tabs.

Flip this assembly over, and attach the riser to the base by using the 3 exposed tabs.


To create the drawers, lie out the pieces for the large and small drawers. These include the Drawer Bottoms, Tabs, Large Drawer Back/Front/Walls and the Small Drawer Back/Front/Walls.

Add glue and attach them using their corresponding tabs to create the two drawers.

Add glue to the tabs, and insert the completed drawers into the case.

Well Done!

