

CUT
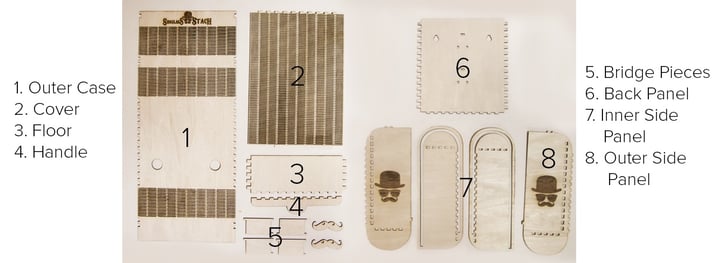
Download the included files and import into the workspace. File 1 can be imported as raster and vector, while file 2 should be imported as vector only. Run each file as separate jobs and remove the components listed below.
COLOR
if you choose to paint or stain your pieces, it is preferable to do so before assembly.

Assembly
Begin by assembling the side walls. Attach the inner walls to the corresponding outer wall pieces.

Pay special attention to the location of the notches and make sure these remain aligned.

Attach the notches of the back panel to the inside of one of the side panels.

Attach the structural floor panel so that the notches align with the side panel and the back panel.

Next, position the cover within the tracks so that the notched tabs are positioned in front of the frame.

Close this assembly by adding the second side panel to the notches. Pay special attention to the cover, and keep it positioned between both tracks.

Next, carefully roll the cover so that the holes on the back cover are exposed. Add glue to the bridge pieces, and attach them.

These will become the bridge of the nose to hold the sunglasses.

Add glue to the decorative mustache pieces, and attach them to the bridge pieces.

Roll the cover back up, so that the notched section is in the center of the two holders.

Next, flip this assembly over, and lie the back cover on top.

Add glue to these tabs, and wrap it completely around, and secure.

Lastly, add glue to the tabs on the cover, and attach the handle piece.
|
|
|
 |
(RE2)
|
|
(RE1)
.SVG |
 |
(RE1)
.SVG |
 |
(RE1)
.SVG |