

CUT
Download and import the design into the workspace. This can be imported as “vector only”. The design will detect 3 path colors. Select a setting that will engrave the blue vectors, and will cut the red vectors. Green vectors should be set as 0 passes. These are only placed as guidelines if you choose to place engraving designs within them. Follow all the steps in your workflow checklist to cut the file. Keep the pieces listed in the image below.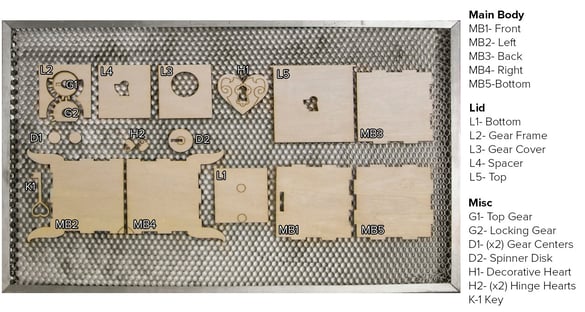
COLOR
If you choose to paint or stain your pieces, it is preferable to do so before assembly. The outwardly visible pieces include: the Main Body pieces (MB1, MB2, MB3, MB4, MB5), the lid (L5), the Decorative Heart (H1), the hinge hearts (H2), and the key (K1). Adding a finish to the mechanism pieces is not recommended as the added thickness and texture may interfere with the movement capabilities.
ASSEMBLY
To assemble the locking mechanism, add glue to the two small disks (D1) and place them within the marked guides on L1. Add glue to the bottom of L2, and position this on top of L1. Set this aside to dry. See next slide..


To assemble the body, lie pieces MB1, MB2, MB3, and MB4 in order and faced down. This order is important because sides MB2 and MB4 have guidelines marked for the hinges. These marks should be on either side of piece MB3.

Add glue to the tabs of each piece and assemble the 4 walls. Utilize the flat top of the box to balance the assembled pieces. Place MB5 face down and add glue to each tab. Add this piece to the box. Set aside to dry. As shown in next slide..


Once the assembly on the lid mechanism has dried, place gears G1 and G2 on the disks. These gears should NOT be glued and should move freely. As shown in next slide..

Add glue to top of D2, being careful not to place glue within the inside of the marked center circle. Position this disk on top of G1 so that the placement lines up with the marked guidelines.

Add glue to the top of L2 and position L3 on top of it.

Next, add glue to the top of L3, and position L4 on the assembly.

Add glue to the top of L4 and position L5 on top so that the keyhole is straight and aligned within the opening. Set this aside to dry.

When the body is dry, add glue to the inside of the guideline on one of the side body pieces and position a heart (H2) so that the hole is facing outwards. Allow this to completely dry.

When the lid is dry, slide the tab of the lid into the opening of the glued heart (H2). Lock the lid by using the key, and add glue to the second hinge placement location.

Add the second hinge heart and allow this to completely dry.

Finish by adding glue to the decorative heart. (H1) and aligning it with the keyhole.

Be aware that when gluing this, the lock should be set vertically, as you’ll be unable to place the key into the box while it is unlocked.

Well Done!

